I recently bought my first E-reader, a Kindle, which I absolutely
love. So I really needed a sturdy cover to keep it protected. I wasn't satisfied with most fabric cover patterns out there, so I set out to make my own pattern for a hardback/leather cover.
It turned out pretty good, so here's how I did it.
First order of business: Supplies!
- Some sturdy cardboard.
- Three different fabrics (something soft for the inside and two thicker fabrics for the outside. I used imitation-leather vinyl because it was cheaper, but leather or any tough fabric would work.)
- 1/2" elastic for the front strap.
- 3/16" elastic for the inside straps.
- Duct tape and masking tape.
- Thin foam padding. (I used some old packing material, but I'm sure anything slightly cushy would work.)
- Spray glue.
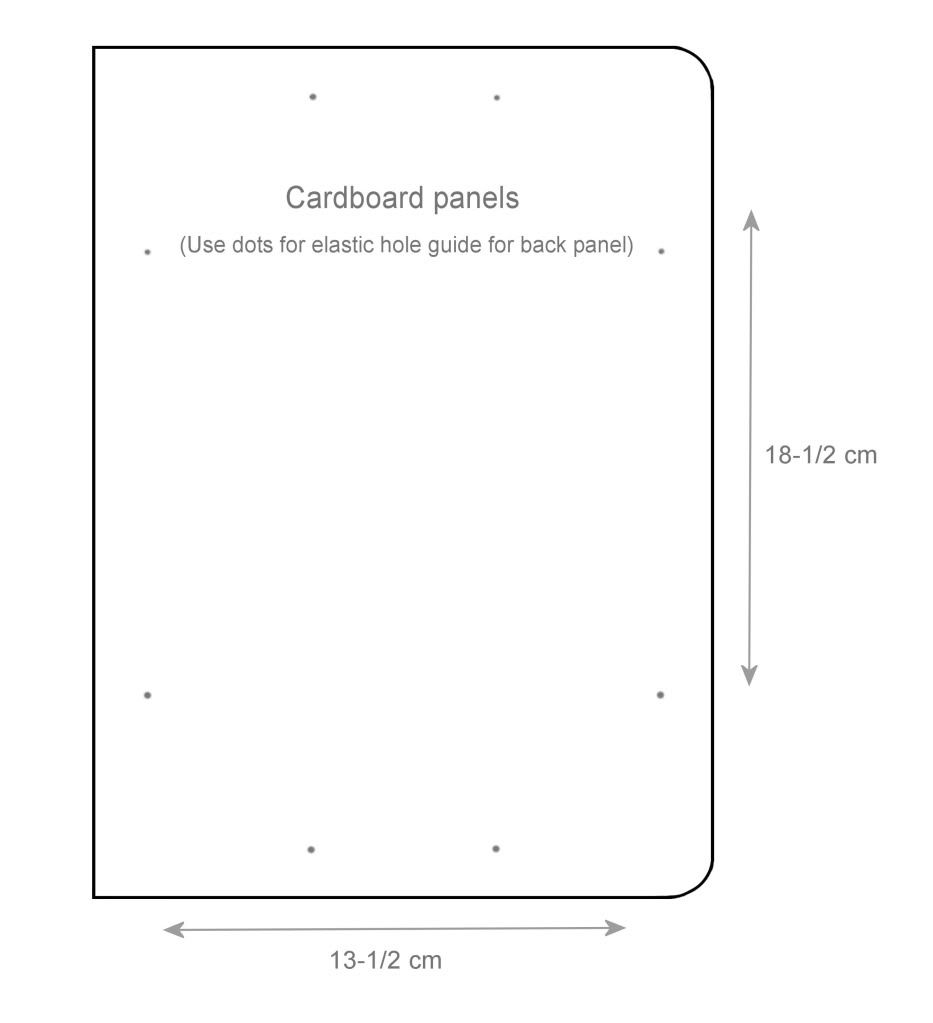
I traced my Kindle and made the cardboard about a centimeter bigger all around. For my Kindle 4 that ended up being 13-1/2 x 18-1/2 cm. You can
download the pattern here if you have the same size E-reader.
If not, just trace your E-reader and add about a centimeter all the way around.
After cutting out the two cardboard panels, I rounded two of the corners on each one.
Now what sewing project isn't complete without duct tape? ...What? Most of them? Oh well, I don't like doing things by the book anyway.
I spaced the two panels 1" out from each other before wrapping them together in tape. This creates a spine for the cover. If your E-reader is a bit thicker, just add more space in between the panels.
After it was all taped together, I grabbed an awl and poked it through the cardboard twice in each corner to make holes for the elastic straps that keep the Kindle in place. They're 1 cm from the edge all the way around and 4 cm from the edge lengthwise and width-wise.
I flipped it over and made a couple tiny holes in the outside of the back panel for the front elastic strap. I measured out 9 inches of elastic and then cut it in half. The holes are just so I could sew the straps on through the cardboard. After finishing the Kindle cover, the two elastic ends will be hand-sewn together.
After sewing the front elastic straps directly onto the cardboard, it was spray glue time! I sprayed a liberal coating on the foam (and my table, hands, and jeans as well... You should probably learn from my mistake and put newspaper down unless you like glue on everything. I apparently just like glue on everything...)
When I got done gluing the foam and my hand to the inside of the cardboard cover, I used a craft knife to cut away the excess from the edges as well as cut out a strip where the spine of the cover is to reduce the bulk there.
After another coating of spray glue, I stuck the inside fabric onto it with the foam now sandwiched in between. (When cutting out your fabric, be sure to leave at least an inch or two all around; it makes sewing the edges easier later.)
Then I took my 3/16" elastic and threaded it through the holes I made with the awl beforehand. (You'll have to use the awl to poke through the newly-added foam and fabric layer first.)
I turned it over and hand-sewed the ends of the elastic together on the back. It's good to keep it a little bit taut so your E-reader stays in place securely.
Now onto designing something for the front panel of the cover. You can really do anything you like: Fabric paint, machine embroidery, iron-on jewels, applique, or even just find a sturdy fabric with a print that you like.
I chose to do an applique and some hand embroidery on this one. After drawing out a simple peacock feather, I separated it into different parts (or color layers) and used the drawings as a stitching guide on top of my applique fabric.
When I was done sewing all around my paper guide, I ripped the paper off and cut away the excess fabric. Since peacock feathers are... well... feathery, I used a toothbrush to make the edges of the fabric ravel a bit to give it some fluff.
Five layers (and one ruined toothbrush) later, the main part of the feather was finished! At this point my brother kindly informed me that it "almost looks like a peacock feather." I took "almost" as a compliment and continued on to hand-sew the rest of the feather.
After spending more hours than I'd like to admit couching feather wisps on, I got my rotary cutter out and recut the edges of the front panel and the other outside fabric. When they were perfectly straight, I abutted them together and took them to the sewing machine.
You could use a regular zigzag to sew the edges together, but I decided to go for a fancier scroll stitch. I wouldn't advise using a slippery fabric stabilizer underneath the two fabrics as it will probably distort the stitch. (Don't ask me how I know that... It's not like I did that once... or twice. Okay, maybe I did.)
Spray glue time again! This is either my favorite part of this project or the fumes are just getting to me. Maybe both.
I whipped out the masking tape and taped the inside fabric in so it wouldn't get ruined by the glue.
It's the same procedure on the outside of the cover as I did on the inside: Spray the foam, apply to cover, fight to rub the glue off my hands, give up, and cut away the excess foam.
Almost done! I just sprayed some more glue on and applied the outside fabric to the cover.
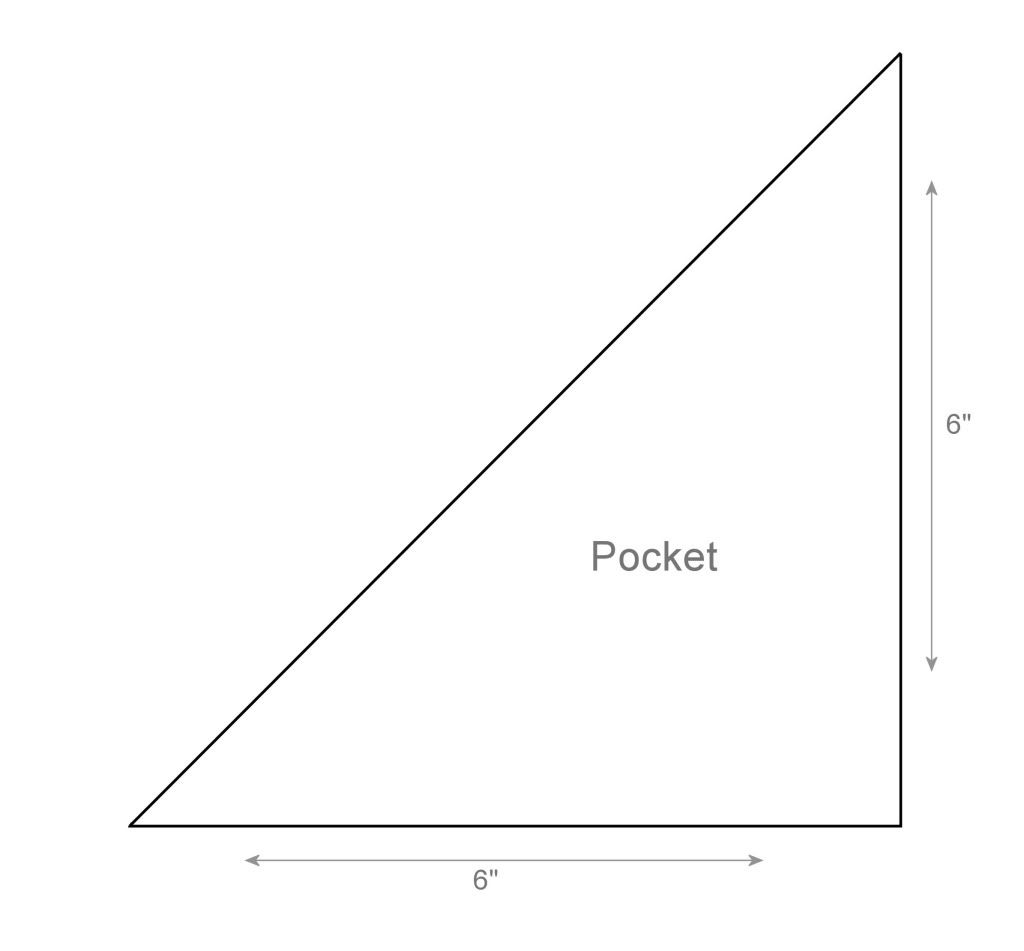
Whoops, almost forgot the pocket! I cut out a triangle from the same inside fabric and sewed under one edge so it wouldn't ravel.
If you're terrible at estimating sizes like me, use a pattern for the pocket like
this one. I pinned that sucker on the left inside panel and took it back to the sewing machine to finish the edges.
After experimenting with several different presser feet, I found that a zipper foot works the best to get the stitching really close to the edge. It's best to sew it with the inside of the cover facing up and the inside fabric pressed down a bit to cover the cardboard-foam sandwich and meet the outside fabric layer.
If you like living on the edge, you can use a contrasting thread color to make the stitching pop, but I stuck to safe invisible nylon thread.
It's starting to "almost" look like a Kindle cover now! I cut away the excess fabric from the edge as close to the stitching as I could without cutting into it. Then I used my favorite sewing aid, Fray Check, and doused the cut edges with it to assure they won't ravel.
Just one more finishing touch and it's done. I pulled the two ends of the front elastic strap together and sewed them to each other. Because the abutted seam looked a bit unsightly, I also sewed a fancy button on to cover that up... Okay, the seam was mainly an excuse. That gorgeous jewel button was going on there anyway.
Done!
A view of the inside.
My first finished Kindle cover next to my second attempt.
This pattern took a couple days to get just right, but once I got the
cardboard and
pocket templates perfect, it wasn't that hard.
If anyone out there tries this project, I'd love to hear about it! Maybe you'll at least find it helpful for ideas.


These are fantastic! I really love the front panel designs.
ReplyDeleteDesigning the front panel is always the most fun part. Thanks! :)
DeleteThis is beautiful! I am featuring it in a treasury to post on my blog halahblue.wordpress.com.
ReplyDeleteGlad you like it, thanks!
DeleteI used an old hardback book cover. (A lousy book, not a good book.)
ReplyDeleteI removed the printed pages and used just the hard covers with the flexible center. Then covered the outside with nice fabric and padding on the inside was felted wool from a laundry accident with a wool sweater. Results: practical and cheap. Not as pretty as yours!